I have been absent for quite a while, and I’d like to think that it was all for great things. Since my last post, there’s been all sorts of fun, including the birth of my first child, and a ton of very positive things at work. Unfortunately, I haven’t had much in the way of will to update this blog, but it seems as if now is as good a time as any.
I’ve gotten to the point in my life where I see two things very clearly: one, I feel very confident in my own capabilities in engineering and execution of programs, and two, I am baffled by the lack of strategic thinking and wherewithal of my bosses. That said, I have been toying around with the idea of starting my own aerospace business for a while.
About two weeks ago, I finally made the decision to take the plunge. The timing of a pair of multi-day work trips presented me a significant amount of time to consider what it was that I wanted to achieve and how I would do it. Based on those conversations with myself, I’ve assembled a first-cut plan that will take me to an MVP (Minimum Viable Product) that I believe will do well to bring in interest and funding. I’ve also strapped together a longer term vision for the company, as well as put together a name and brand identity – which will all be revealed in due time.
Now I need to get to work. There’s a lot of code to write, systems to test, and administrative effort to undertake just to get everything up and running as I bootstrap it. I have a bunch of vacation available, and I am going to allocate some of it very soon to fully committing to development.
In my last post, I discussed my experience with selecting parts for my quadcopter drone as well as building the danged thing. That all went reasonably smoothly, so I was all amped up to get outside and fly.
I headed to the back yard, and spun it up. All good.
Then I started to give it some throttle, and all hell broke loose. It zoomed around, seemingly uncontrollable, and crashed into our neighbor’s yard. Not wanting to be a quitter, I have it another few attempts, all as bad as the last. On one “flight,” I even nudged the throttle enough that I tossed the quad over the house and lost sight of it. I was sure that I’d find it planted in a car windshield, but strangely, it was right side up in the middle of our street.
I thanked God for that and immediately went inside to figure out what I was doing wrong. Turns out, I was flying in “acro mode,” which was more challenging for a complete noob to handle right out of the gate without really understanding it. Internet recommendations near and far recommended lots of simulator time with games such as Liftoff and Drone Race League.
But I wasn’t going to do that. Instead, I found the easier mode to handle, horizon mode, and started working with that. It’s a little bit more controllable, as the quad returns to level once you let off the sticks. I started getting a heap better at floating around the back yard and maintaining control of the quad. It was awesome! I loved it, and I was ready for more.
The next step was getting that first person view (FPV), so I could virtually fly through the skies on my quad. I ordered some goggles, a camera, and a video transmitter, wired them in, and I was all set to go….go crash a hundred times in the yard. The perspective totally screwed me up and I had to re-learn how to fly FPV after all that line of sight flying. I started heading out to a local middle school soccer field to give myself some more room to start to sort it out, and I was ultimately successful!
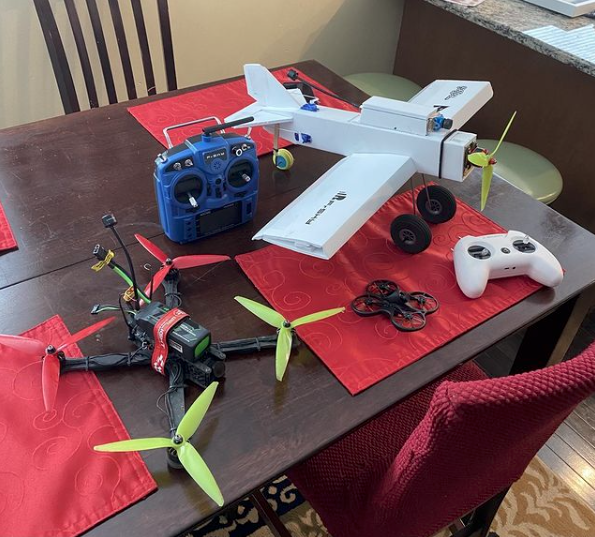
My amassed RC fleet – 7″ quad, Tinyhawk II whoop, DIY foamy plane
I also picked up a Tinywhoop – a small quad for flying in the house – and started zipping around the living room and basement. This amused the heck out of my wife and two step-sons, as it was a hoot to chase them around the house. Flying in the basement was particularly helpful to my overall flying technique, as I had to zoom through a bunch of obstacles and make plenty of tight turns. Winter had set in, so that also gave me a way to keep flying.
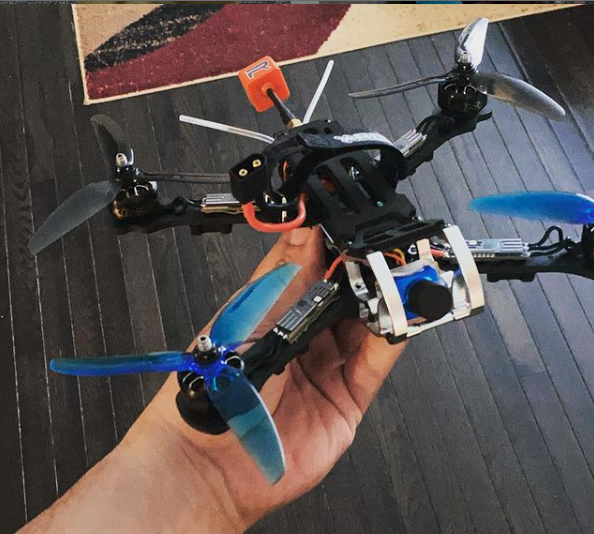
By the early part of this year, I had a hankering to build another quad. I swear, half the fun is just choosing the parts and building up the excitement of the new thing. So, I upgraded the motors on my 7″ to some 2806.5 Xings, and began to line up what I would need to use the old motors as a seed for a new 5″ quad. I ended up building a knock-off Armattan Rooster, a fun quad with a metal front cage for the FPV camera. I also put in some future proof components: Speedix BLHeli32 ESCs, and a Kakute F7 flight controller that can run Ardupilot if I so desire. We use that a lot at work on Pixhawks, so I’m looking forward to eventually installing that and trying out some of the autonomous features.
5″ Rooster Knock-off
Since building the Rooster, I’ve been trying to fly as much as humanly possible. If weather permits, I go out and burn through 3 packs at lunch during the work week. Being an aviation company, they’re completely down with it, and I often get spectators hanging around to watch me zoom around the parking lot. I think I’m starting to get a bit more comfortable with all the acro stuff, but there’s still tons of work to do. Here’s a little video of me flying this past weekend at Peace Valley Park in PA! Apologies for the video quality, but the receiver on the Fatshark Scout is meh. Anyway, enjoy, and keep flying!
I’ve been passionate about flight ever since I was a kid. Dreams of being an astronaut and a fighter pilot danced through my head constantly throughout my youth. In high school, I was dealt the bad news that I would likely be neither of those things: I had asthma, bad eyes, and I was too tall. These we individually enough to require waivers, and together, a fatal combination to my plans.
I have bounced around through many other fields in my life, as detailed in previous posts, but aviation has always been nearby. Model rocketry ebbs and flows in my timeline, as does flight simulator work. My previous and current positions are both in aerospace, and I am regularly part of flight test teams.
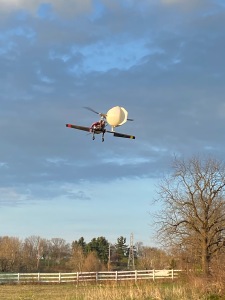
Out flying the Piasecki Scaled Demonstrator in PA
The company I work for now has many Unmanned Aerial Vehicle (UAV) programs. Many of the staff are both standard and RC pilots. After a few months there, I decided that I wanted to get into flying RC, something I had been interested in as a kid, but never had the cash to get involved in. I decided to jump into the First Person View (FPV) quadcopter craze and go full bore.
And what a trip that has been!
First off – there is an incredible amount of research to be done:
What size quad to get (Whoop, 3″-8″, etc.)?
What batteries to use (4s/6s/11ty-S)?
What style (Freestyle, Cinematic, Racing)?
What video equipment (Analog or DJI)?
Pre-built or DIY?
I’m pretty darned handy with most things electrical and mechanical, so I chose to go the DIY route. That opened up a whole other can of worms:
What frame to buy?
What motors?
What propellors?
What electronic speed controllers?
What radio system?
What video transmitter?
and on and on.
I slowly consumed everything that I could find on the web, watched tons of Joshua Bardwell and Rotor Riot videos (check them both out on Youtube, they’re phenomenal), looked at other folks’ assemblies on rotorbuilds.com, and honed in on what I was going to buy. A few clicks later on Amazon, and the parts were coming to my door.
That was the easy part. After everything arrived, I spent an entire weekend sorting out how everything needed to be laid out in the frame and connected. I powered it up, and for the first time, heard the wonderful “doo-dee-doo….dooo dooooo.” No magic smoke escaped, so I hadn’t wired anything too wrong. I did find that two of the motors were spinning backwards, which meant I had to swap some wires, but otherwise, everything worked after tweaking some configurations in the flight controller software. And that was it!
I’ve been MIA for quite a while on this blog. To be blunt, I don’t believe that I had all that much to say. All the car video posturing below didn’t quite pan out. I put that on pause while I sorted out some life things. In the meanwhile, I’ve moved, started a new job, gotten married, and I now have a kiddo on the way. It’s been a pretty darned exciting time. Things have settled down enough now that I feel ready to start digging back in to the intent of this blog: to document the things I was going to try to do to improve my life. That goal still exists, and in many ways, it has very much been renewed.
So, over the next few days, I’ll start filling you all in on the things that I’m working on.
In my last blog, I mentioned that I planned on releasing a car-related YouTube video in a few days. About a week has passed since I wrote those words, and I don’t particularly enjoy feeling like I’ve fibbed or lead someone astray. So instead, here is a list of things I’ve encountered in the last week while attempting to record the aforementioned video.
A bit of context: the particulars of the video I’m trying to record involve a review of a car exhaust part. This involves two core components: a thorough evaluation of the craftsmanship of the part, and then an installation and reflection on the performance of the part.
The first hurdle I encountered was a technical one. The main camera that I use for video is a Canon Rebel T4i. I’ve had the T4i for 4 years or so. I’ve used it for everything from taking headshots to street photography, car show pics to audition video. The quality of the photos is exceptional, especially with the suite of lenses that I have available. Unfortunately, when it comes to video, it left something to be desired.
The issue is the auto focus mechanism. Canon makes three lens actuation types that fit the T4i: Standard, STM, and USM. Of those, the STM lenses are the best for video because the servo/gearing mechanism that they use is very quiet. Unfortunately, all three of my lenses are of the Standard variety, and servo drives are very noticeable during video capture. I hear tons of servo clicking throughout the video, which is incredibly annoying (see video below). Of course, I could turn off the autofocus, but that limits me in terms of what I can do in frame. For example, if I want my face to be the primary focus and then move to the car, I have to reset the focus manually, which is a pain for continuous shots.
To mitigate that, I ordered a Canon 18-55mm EF-S STM lens off of ebay, which was due to arrive Saturday. Unfortunately, it appears to be doing loops between USPS facilities, and hasn’t arrived yet. Hooray.
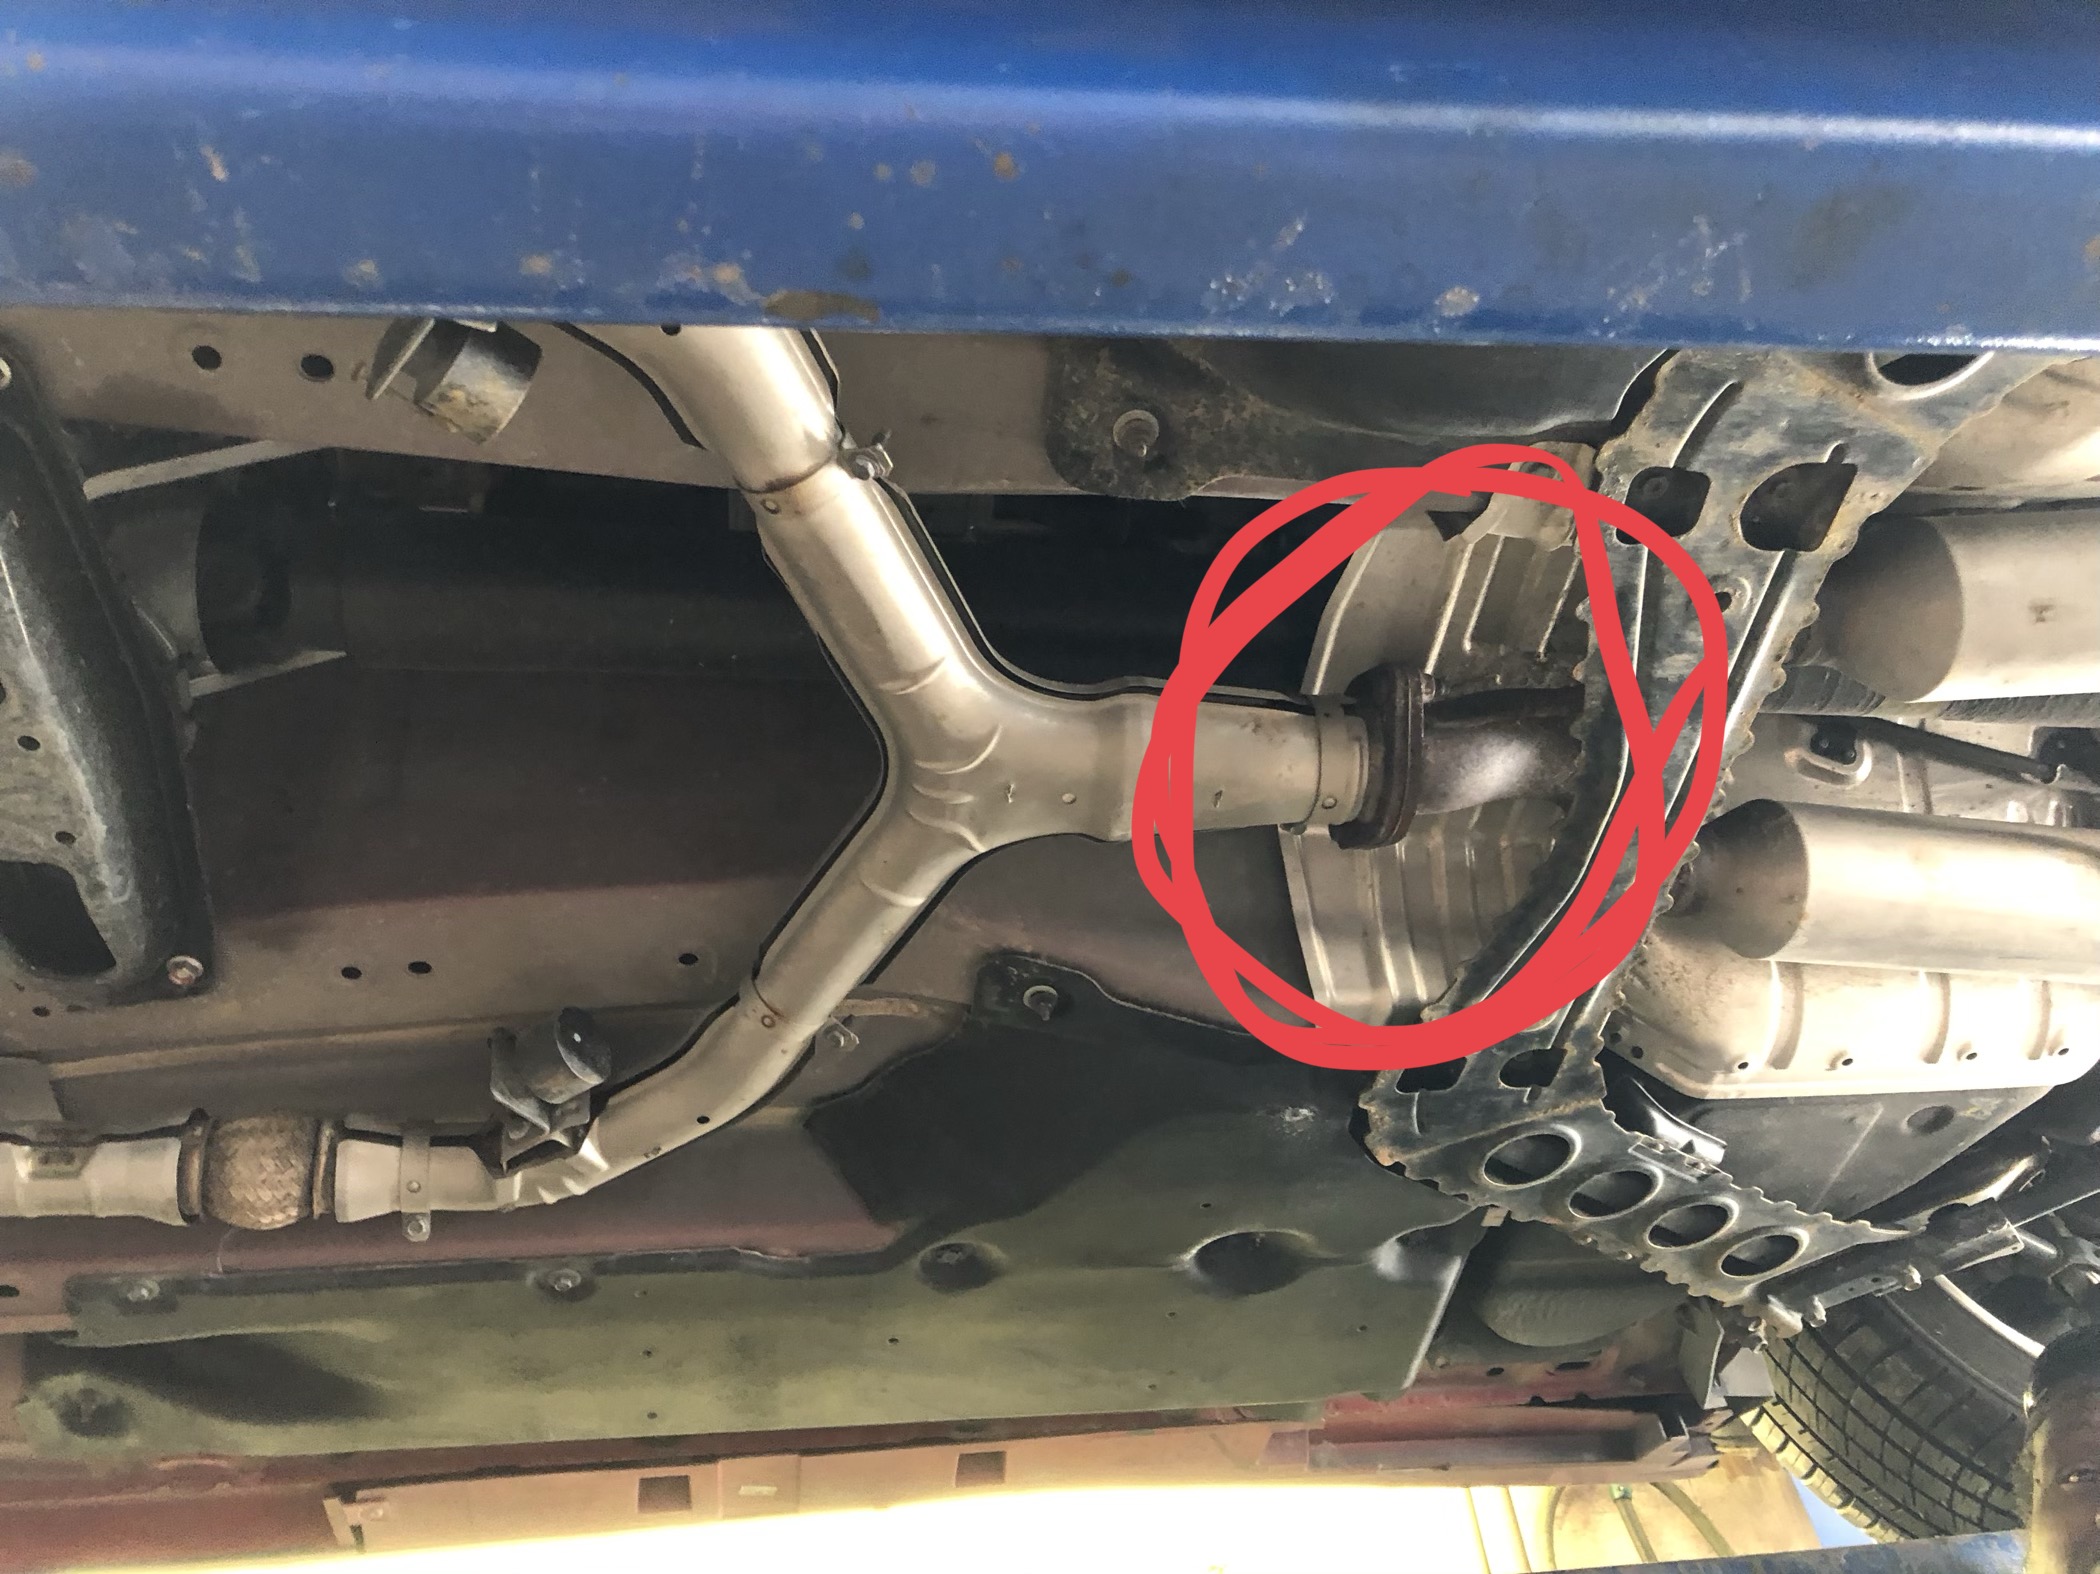
The second obstacle has been a common one: old, rusted bolts. On the existing part in question, there are two bolts that connect the front half of the exhaust to the rear half at the Y-pipe. They are heavily corroded, and even my electric impact wrench can’t get them off with ~100 ft-lbs of torque (that’s real, I’ve tested it that high). I will hit them with penetrating fluid as soon as the weather breaks…which is the third problem.
These two little bastards right here…
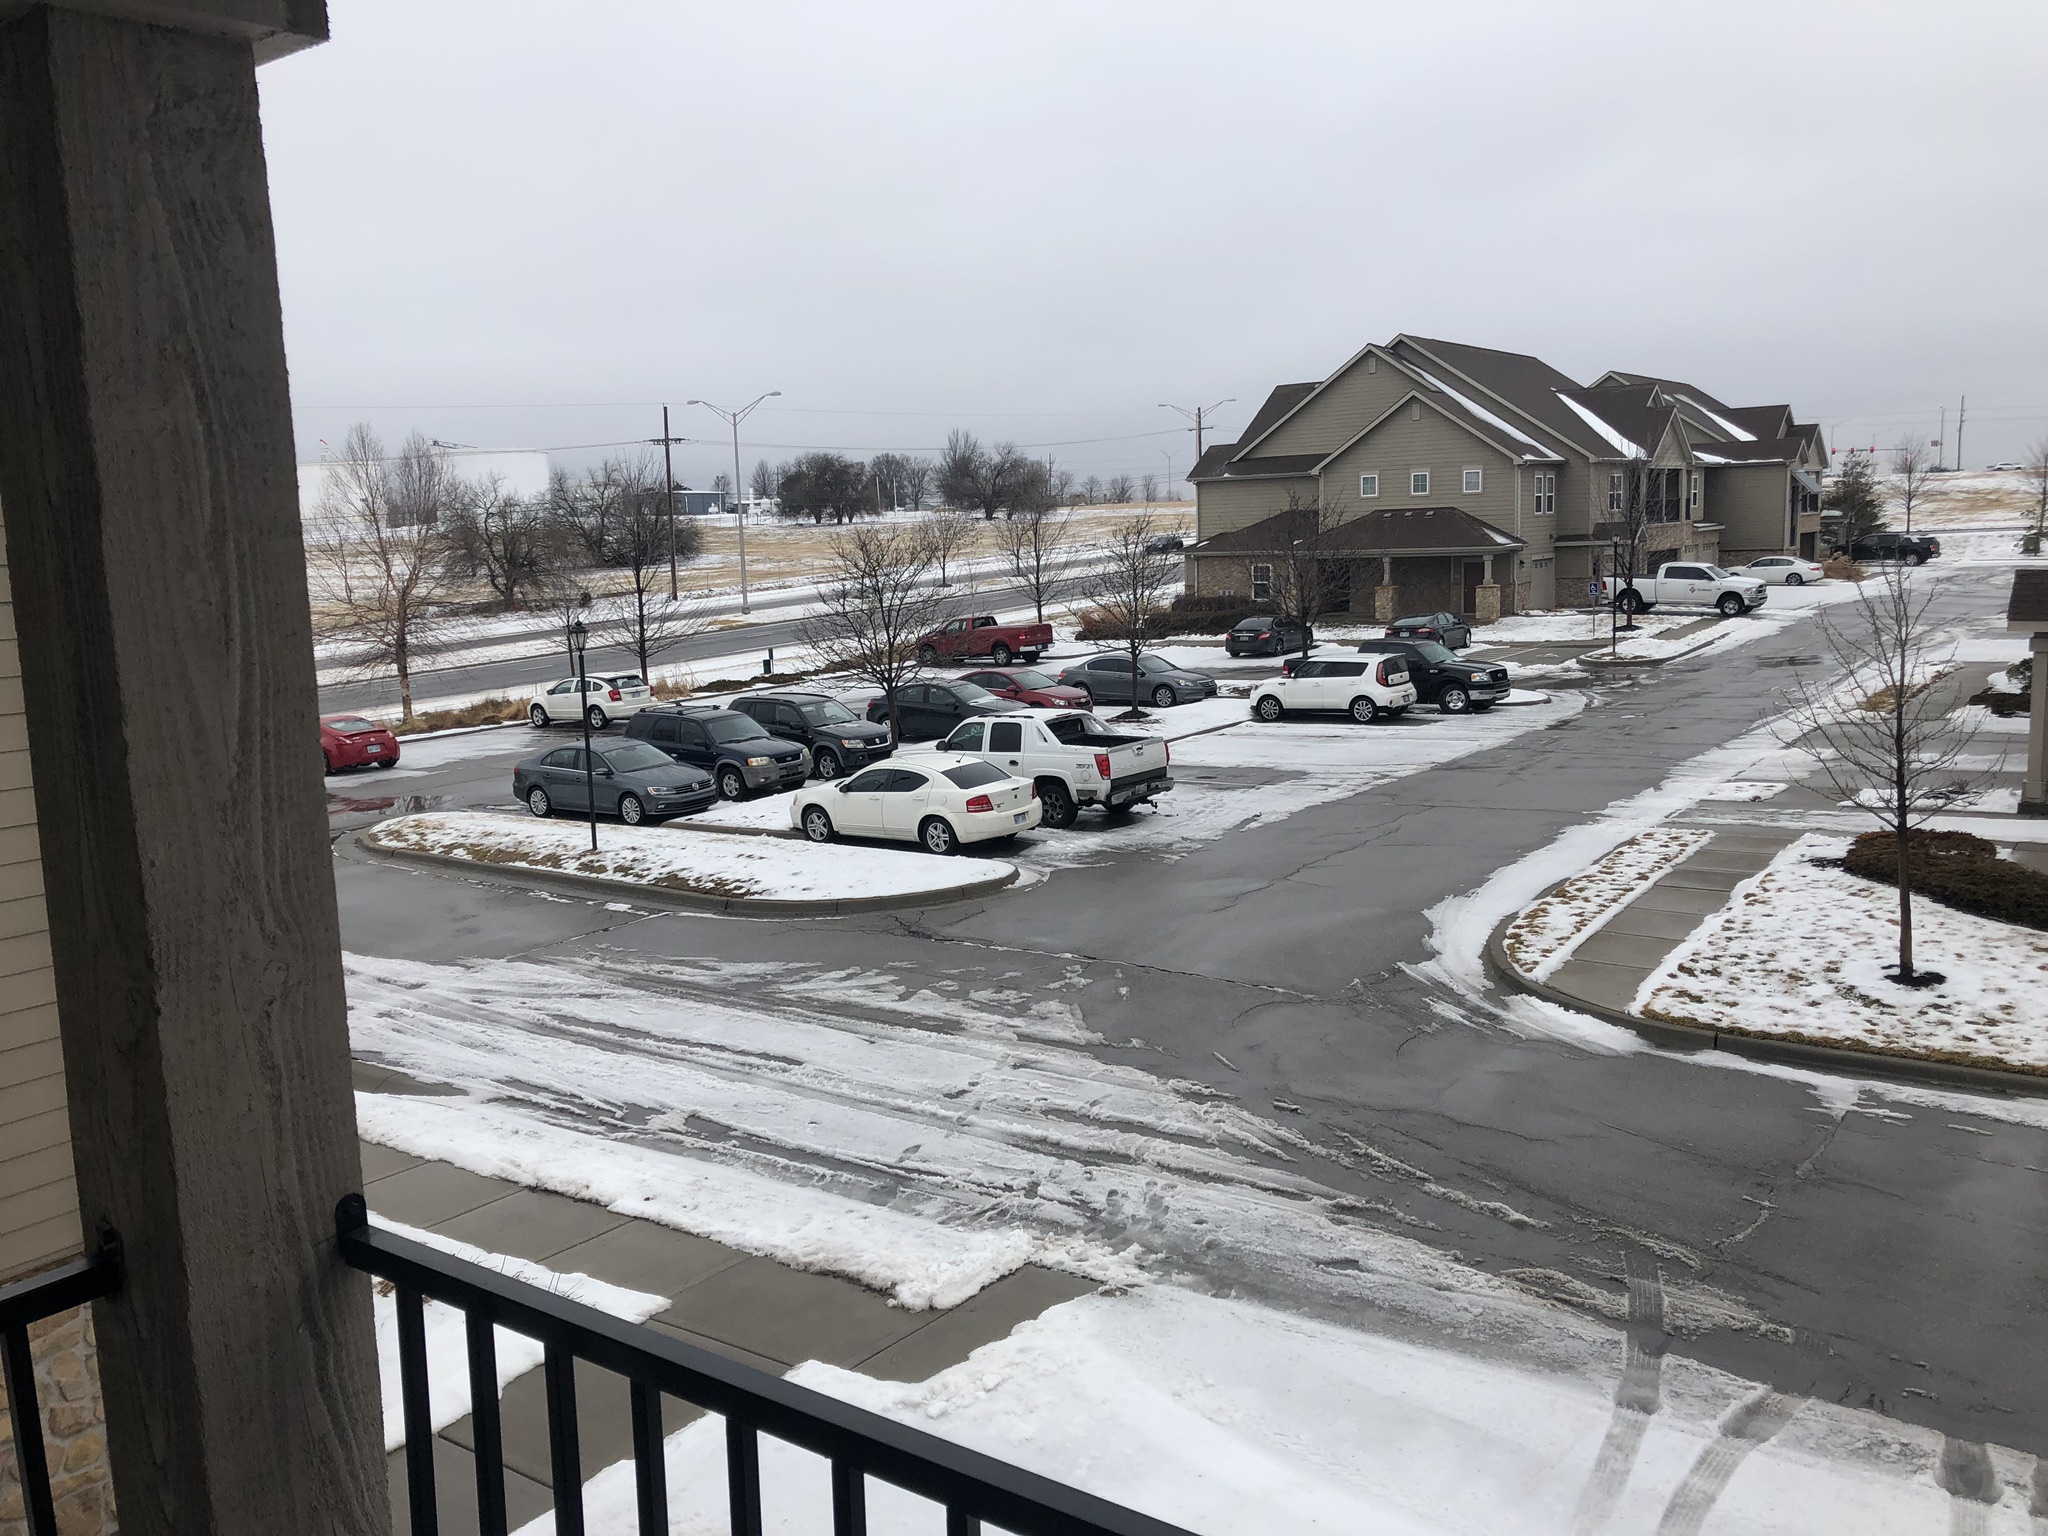
The weather in Kansas has been just awful for the last few weeks. We’ve had snow and icing non-stop through the span, and it shows no signs of letting up over the next two weeks. This is killing me, because I live in an apartment complex and cannot wrench on the car in this mess. It’s just too cold and too wet. In the long term, I’m hoping to find a wrench space for rent to shoot these videos, but things like bookgaragetime.com have not taken off in the KC area yet. So until then, I must wait for a sunny day.
Not exactly a winter wonderland…nor great for wrenching.
The last challenge I face is knowledge-based. I do know a fair bit about mechanical engineering, but when it comes to welds (a major topic regarding exhaust) my experience is a tad limited. I’ve taken a how-to class on TIG welding, practiced a little MIG, and played with a stick welder, but I am by no means a pro. So, when I went to critique the welds on the part, I felt a bit out of my element and inauthentic. I’ve been rectifying that over the last few days by learning as much about welds and weld inspection as I can, though most of it is related to structural welds and irrelevant to these parts. It has still been a fascinating endeavor and I’m glad I took the time to explore it. I can guarantee there will be plenty more times like that, as I don’t know everything…
…even though I claim to. Hopefully, my next post will be a pleasant review of the video-making experience. ’til then, so long!
Back in October, I made the foolish decision to take my car out to the race track. I consider it foolish because it re-lit a fire that had been relatively stifled in me for a few years: a strong desire to drive my car hard and modify the living hell out of it.
While most would probably suggest that the former is the biggest concern, it’s actually more the latter. The time that is spent in researching the appropriate modifications for your car can easily consume months of your life. It’s also very easy for the costs associated with all the mods to skyrocket in a heartbeat.
The reason for this tends to be one of a few possible options. First there’s the good old “keeping up with the Joneses.” In the age of Instagram, you can find thousands of pics of your very model car with all sorts of wild work done. The attention that those photos gather is more than enough motivation for one to start bolting all sorts of body work and lights to your ride. Another common reason is simply a lack of focus. Some guys just want a cool car, and that means continually bolting something new on. Turbos hot this year? He’s dropping 10k on a Greddy kit. Widebodies? He just ordered a Veilside kit for his RX-7. I happen to fall prey to a third option: wasting all the time and buying almost nothing for years, then suddenly dumping tons into a car for some impulsive reason. I did this with both of my Probes and with my first (S14) 240sx.
This time seems to be a little different for me for several reasons. During those “impulsive” runs, I was stalled due to a common problem. As you modify cars more and more, they usually get less streetable. Throw in a high performance exhaust, and they annoy your neighbors on cold mornings. Upgrade to race suspension, and your back is snapping every time you go over a speed bump or railroad crossing. Add a roll cage, and you’ve actually created a car that is more lethal for you if you’re not driving with a helmet on. So, if you attempt to maintain one of these cars as a daily driver, it’s always going to be a compromise.
After being bitten by the track bug, I quickly came to the conclusion that I need a track car. The Z with the sport package was the perfect choice, as it’s already fairly well sorted for it out of the box. It’s also barely tolerable on the street: it’s poorly insulated & damped (lots of road noise), the clutch has a bizarre feel to it thanks to the dual-mass flywheel and concentric slave cylinder, and the throttle map in first and second gear is completely nonsensical (it’s throttle-by-wire, so the computer actually determines the throttle level). With only an oil cooler, an electrical switch for the VDC/ABLS, and some new brake pads, it was already set for beginner track duty.
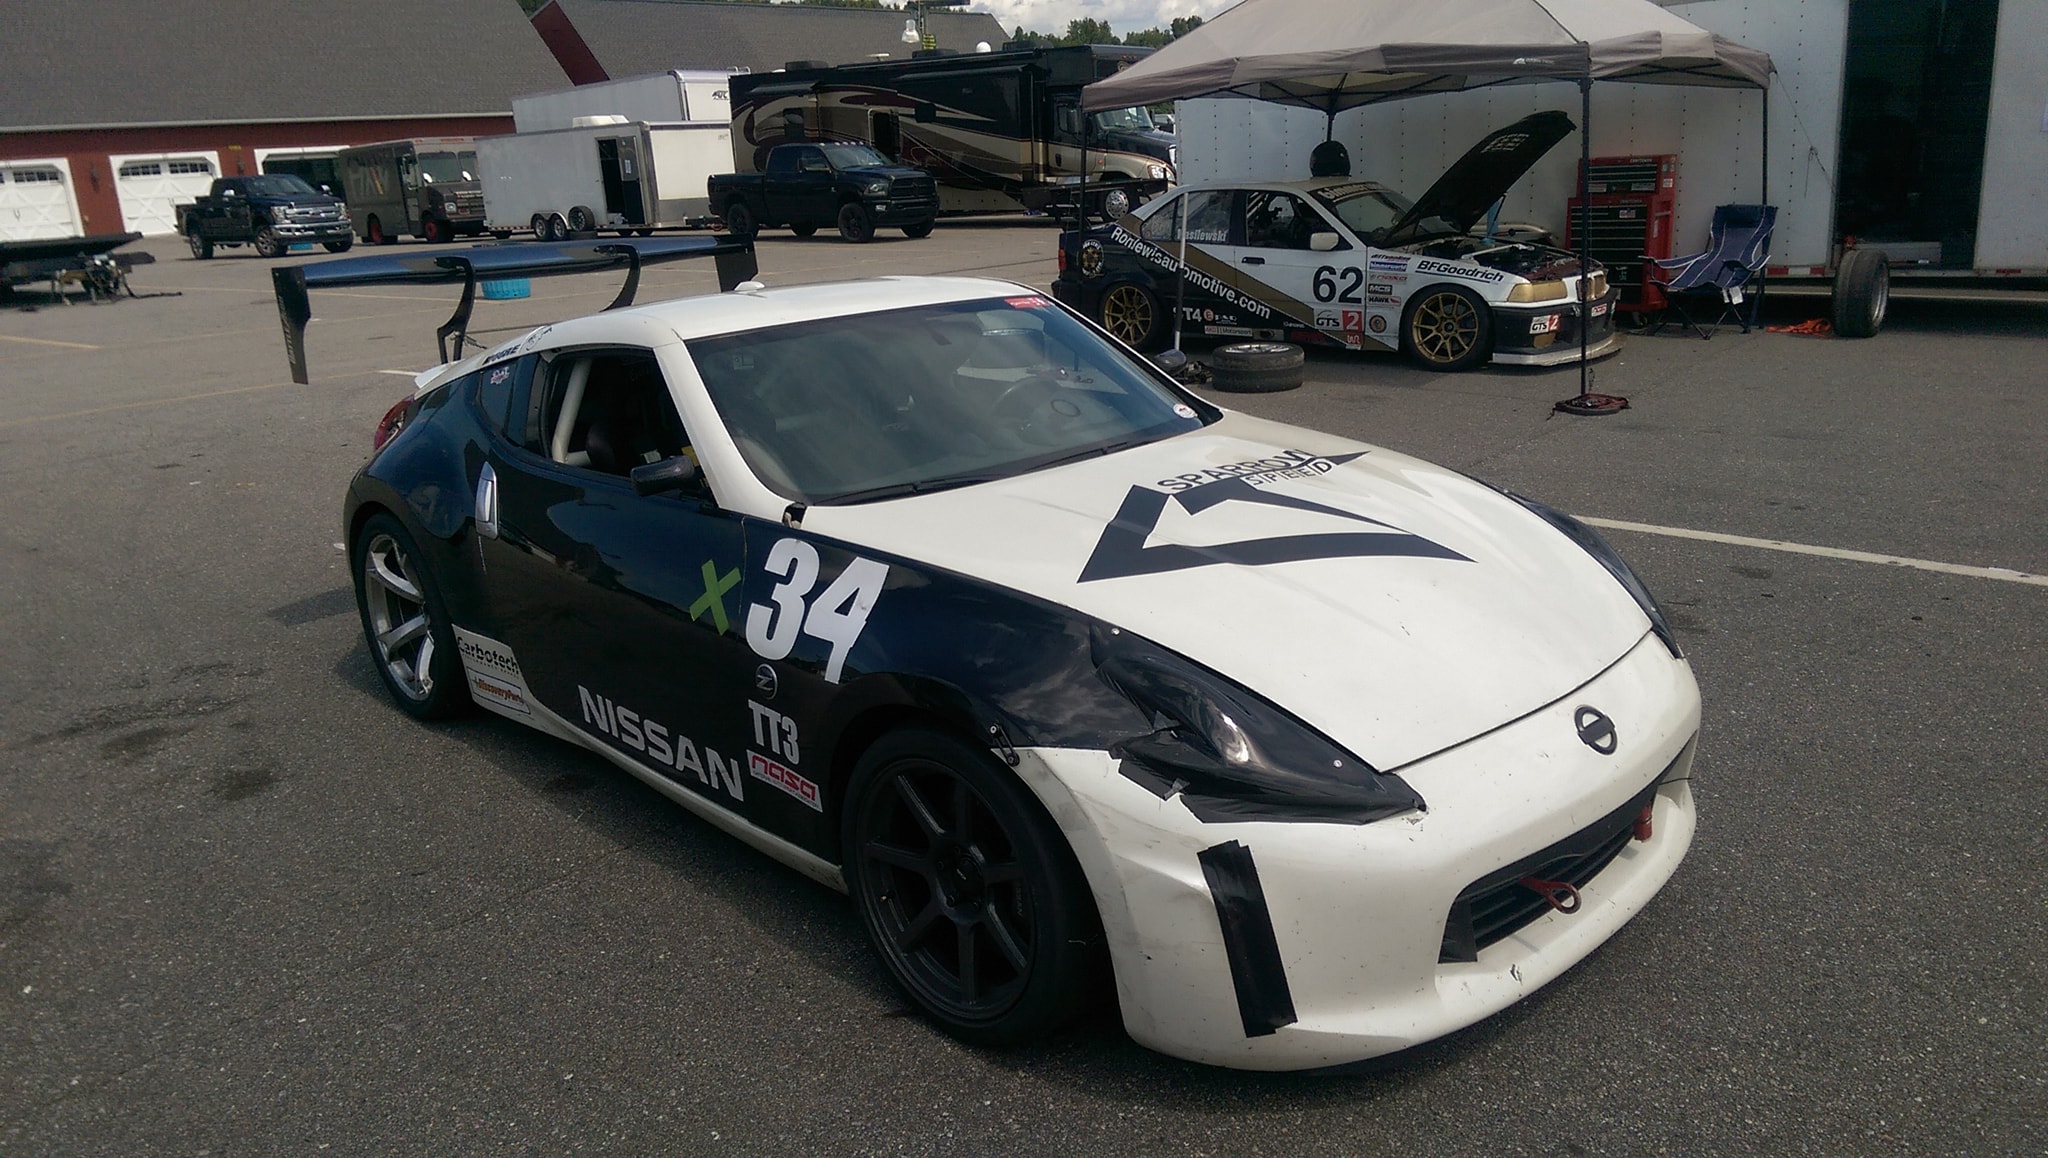
But taking it to the next level is going to take some doing. I’d like to spend this year (and maybe 2020) becoming a competent driver, and tweaking the Z for the track along the way. That’s going to mean exhaust, aerodynamics, suspension, and safety gear. Luckily, I have a reference for what to do:
Sparrow Speed Z
Eventually, I believe I’m going to find myself jonesing for wheel-to-wheel racing…and that’s going to mean following up with a roll cage. That’s when I’ll have to pull her off the street and start towing her around.
As an experiment, I’ve decided to document the whole thing on YouTube and Instagram. I can use my mechanical engineering background to analyze the manufacturing quality of the parts that I purchase, and show the installation and track the improvements. I’ve never quite put myself out there in that fashion before, but I’m willing to take a chance on it. I’m sure I’ll learn a few things along the way, and I’m certain I’ll make some new pals.
I’ve already gotten a start on this path. I purchased a Y-pipe for the exhaust, and I’ve already taped a review that I’ll be posting in the next few days.
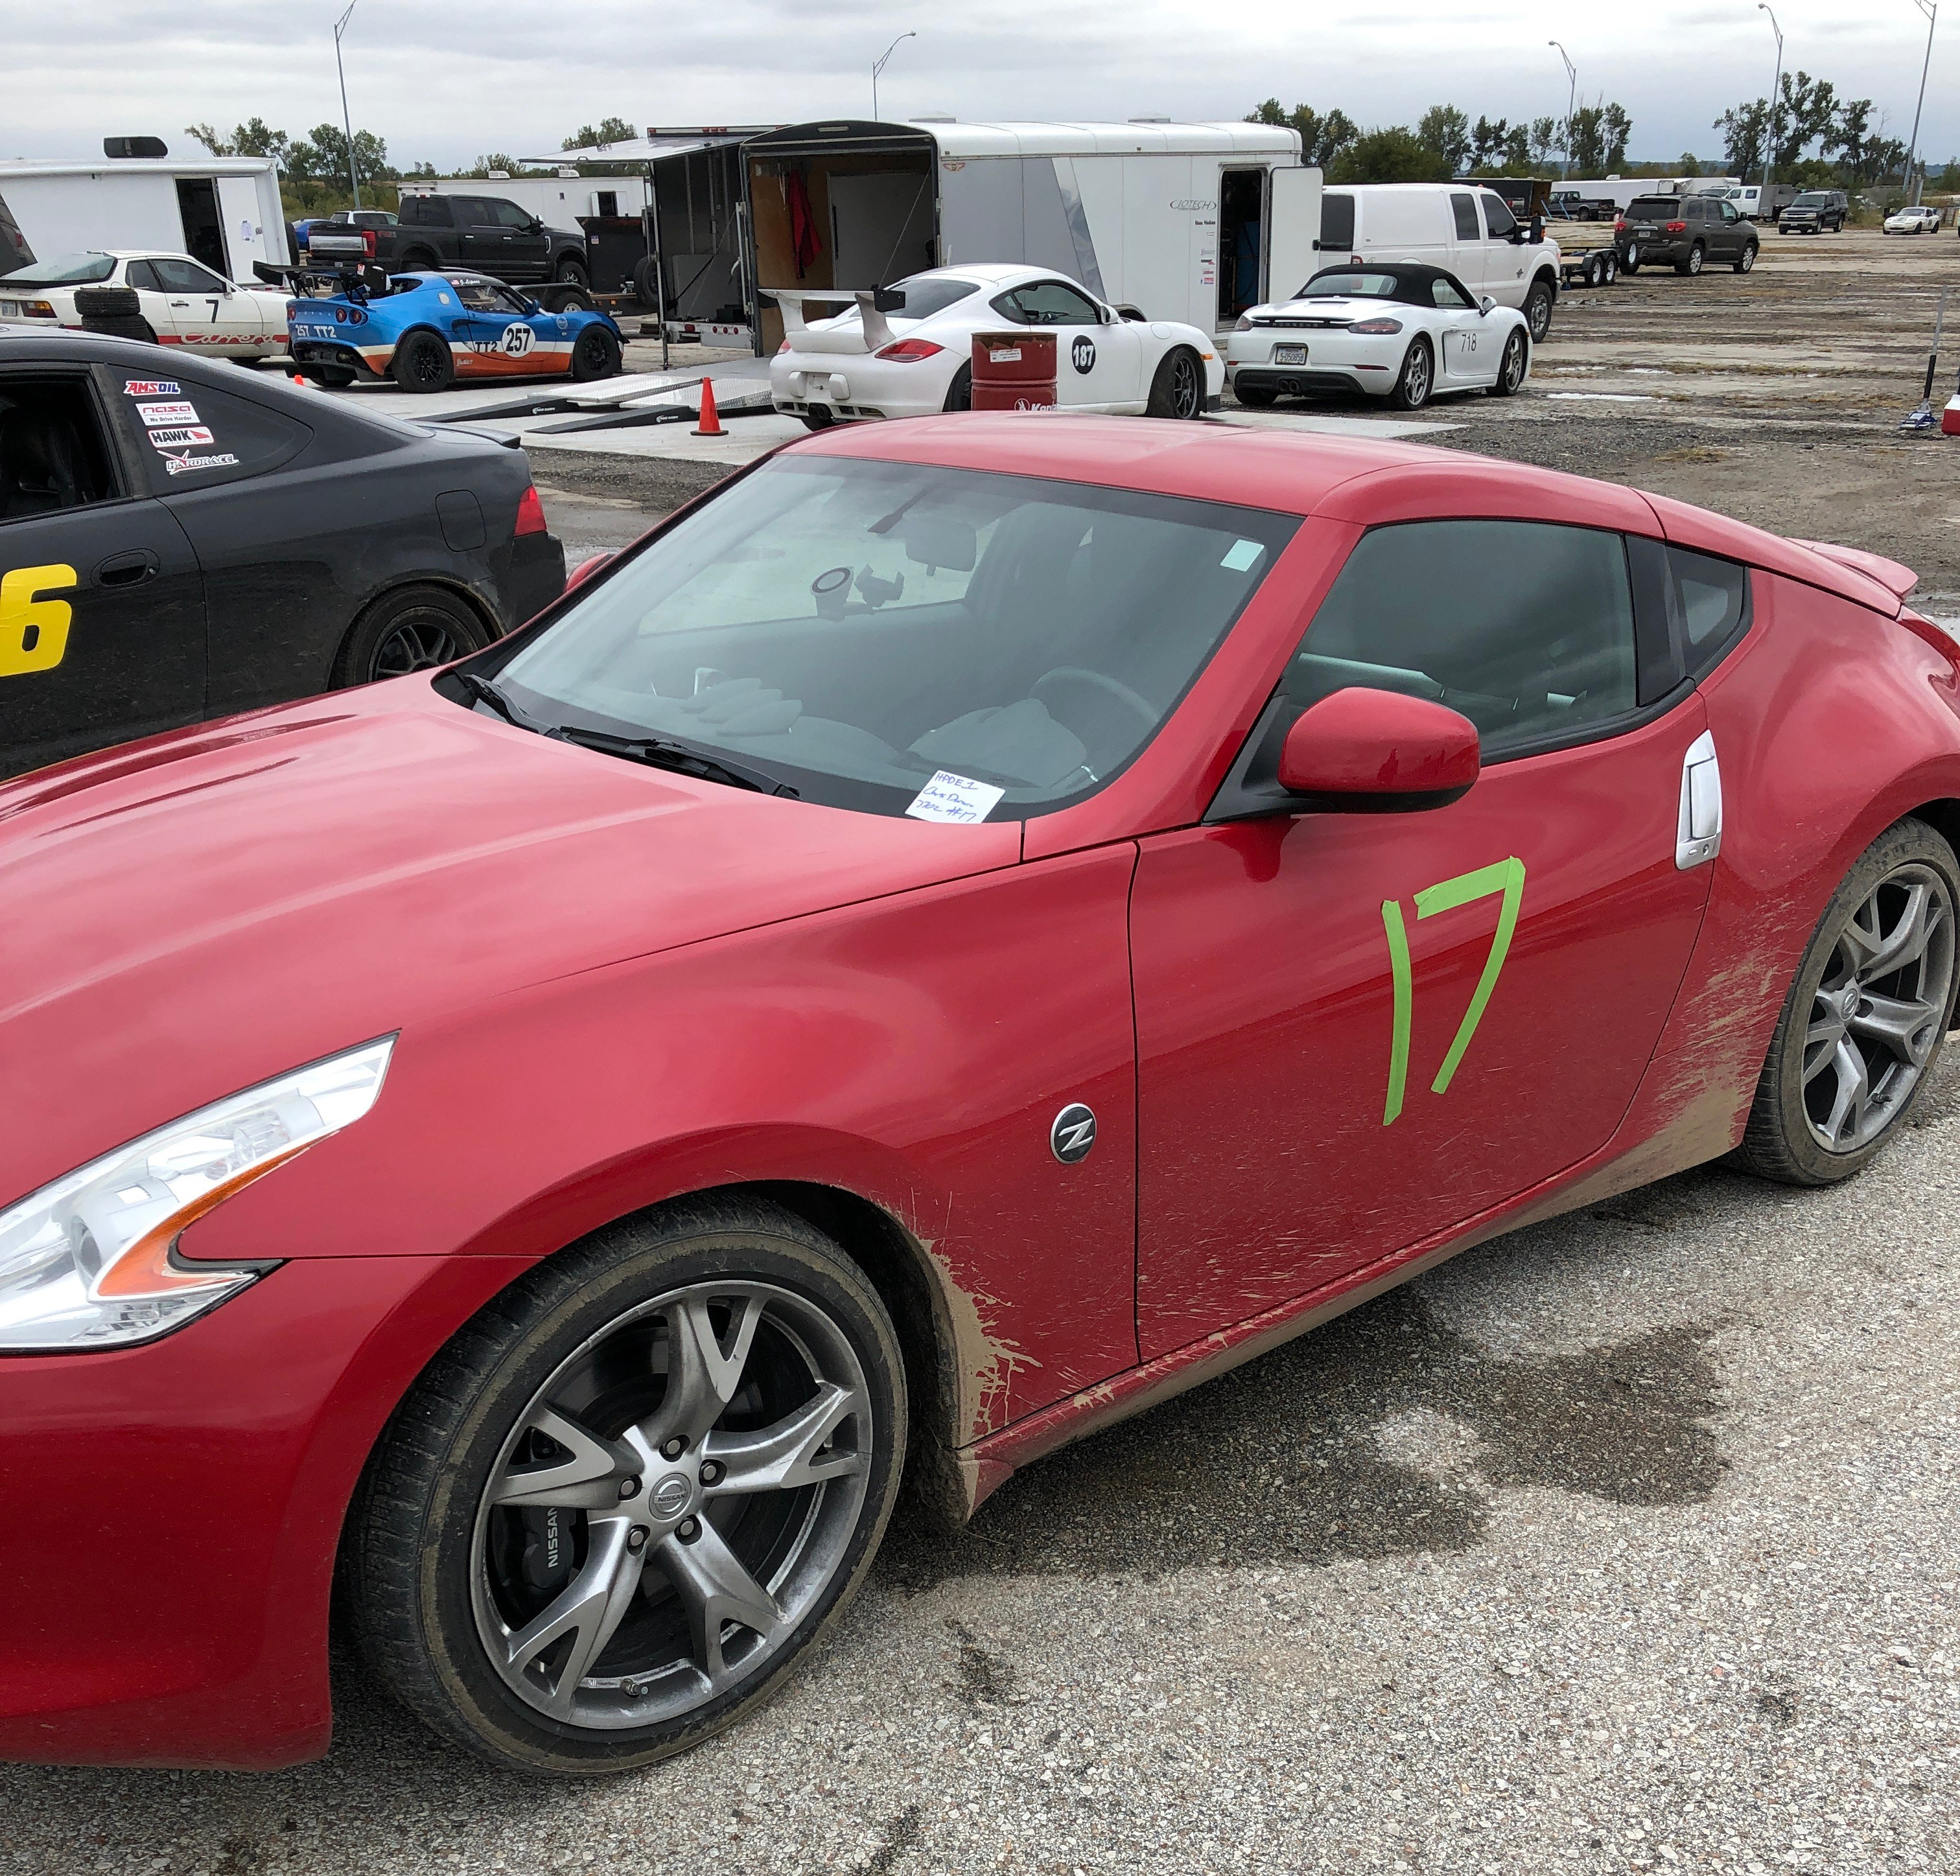
My 2010 370Z with handcrafted numbering and mud from turn 3.
Over the course of this past summer, I found myself diving back into the gearhead world. It started with the simple things, talking to guys I knew were into wrenching, going to the occasional car show. But by the end of August, I was running out on the streets late at night. I’d take my 2010 Nissan 370Z Sport out for a spin to find any place that was open and unpopulated enough to rev up the glorious VQ37VHR to redline. I’d dig through Google maps during the day to find those glorious spaghetti roads that make you feel alive as you take the turns.
Somewhere along the line, I realized I was holding back the car from it’s performance potential. The new Z is a modern marvel. I know, I know…it’s not the GT-R (shoulda kept the ‘Skyline’ moniker, Nissan. Tsk, tsk), but with 332 crank horsepower, a smooth 6-speed manual gearbox with rev-matching, big and meaty tires, and fantastic suspension tuning, this car is meant to put down solid lap times at your local road course.
Note: I said road course, not streets.
The lightbulb went on, and I started looking up all the fun ways to get on a track.
NASA
I’ve always loved the National Aeronautics and Space Administration, but I’m not talking about that variant of the acronym today. The National Auto Sport Association is one of the two major entry-level motorsport clubs, the other being the Sports Car Club of America (SCCA). While both of these clubs have driver’s education and plenty of time spent on track, I found that NASA’s level-up High Performance Driver’s Education (HPDE) aligned well with what I wanted to do. HPDE is broken down into four groups:
HPDE-1: You hit the track in your car and drive around with an instructor in the right seat. They give you pointers or yell at you, depending on what’s required in the moment. After each session, which is normally about 20 minutes, there is a “download/debrief,” where you meet with the rest of the drivers and a senior instructor, and discuss the session. You can ask questions, get tips, and lodge complaints against other drivers if necessary. On track, there is no passing unless the driver in front points you by.
HPDE-2: You are deemed by your instructor as safe enough to be on the track without him in the passenger seat. Passing rules are the same as HPDE-1, as you run with them, and you join the HPDE-1 drivers in the post-drive download session. To move up to HPDE-3, you must have a checkride with an instructor.
HPDE-3: Passing rules are looser here, and the speeds are starting to move up.
HPDE-4: Passing is open, and we’re starting to hit race speeds in the cars.
There is no limitation on how long you have to stay in each group. It is up to you and your instructors to determine where you fit best. However, as you progress, you will receive sign-offs in your “NASA Passport” which allows you to run in your proper group at any national NASA event, no matter what region or track you go to. After you finish HPDE you can start running in time trials or you can get your competition license to race wheel-to-wheel, if you so choose.
This all sounded perfect to me, so I hopped back on the interwebs and found the soonest and nearest event. It would be early October at Racing Park of the Midlands (RPM) in Iowa.
Getting Prepared (insert montage here)
I had figured that getting prepared for my first HPDE would largely be a mental exercise. After all, it is touted that you can just show up to HPDE-1 in your street car and be fine (which I did see by way of a Toyota Camry).
However, after a little research, I’d soon find that I wouldn’t be so lucky. The early model year 370Z’s have a few minor issues that need to be addressed before they are track-ready. First off, I have a Sport model. While that has some cool upgrades such as the aforementioned rev-matching SynchroRev transmission, front/rear spoilers, better wheels, and the Akebono brake package, the pads that are used in the brakes are awful for track use. Some reports I saw mentioned that a standard set of street pads would be to the backing plates (a.k.a., toast) after one day of tracking. That would be my first order of business: I placed an order for Carbotech XP10f/XP8r pads, which came highly recommended by the gang at the370z.com. A secondary but related problem was that the fluid used in the brakes and clutch would boil with heavy track use. The solution was to upgrade to Motul RBF 600 fluid for both, which has a much higher boiling point.
Finally, my 2010 Z has no oil cooler. This means that it will overheat the oil in a few laps, cutting my sessions short. That simply would not do. The later model years have built a small oil cooler into the radiator as a nod from Nissan that this was indeed an issue. However, even that cooler is not substantial enough for heavy track use. I placed an order for a Fast Intentions 34-row oil cooler, which would handle anything I could ever imagine to throw at the Z.
Parts and fluids now ordered, I had some time to wait for everything to arrive. I spent my workday mornings watching videos of RPM to learn the visual cues of the track. I located a few videos on Youtube which had cars of similar power to mine, so I could get a feel for the speeds at which I’d be encountering each turn. I’d quiz myself about each turn’s approximate angle (90 degree or 45 degree turn?), where the apexes were (where to touch the inside corner), where the track outs were located (the end of the turn), and what preceded/followed each turn. It was good fun to get a feel for the track even before being there once.
The Motul fluid was the first to arrive, so the weekend before the HPDE I swapped out the brake/clutch fluid and bled the brakes. This was actually my first time doing any real work to the Z, even after owning it for over a year. I was amused by that, as I’ve never gone that long without modifying a car. The Carbotechs would arrive two days later, on Tuesday. That night, I worked feverishly to get them in the car, hoping to finish before the sun set. I bolted the wheels back on around 10PM, killing that hope, though it did work out. The Carbotechs are a heavy metal brake set that require something called “bedding.” After I finished the install, I found a long and empty road nearby so I could perform this process, which involved a sequence of heavy braking from 60-20mph and 80-30mph. Everything worked great and the car felt like it would stop on a dime after this upgrade.
The oil cooler didn’t arrive until Thursday night and it was pouring rain all day. That meant I’d have to install it Friday afternoon and immediately leave for Iowa when I was finished. That also meant wringing out the car would be done on the 2.5 hour drive to the hotel in Bellevue, NE.
I managed to get the oil cooler installed in about 3 hours, damned good time. I actually had just enough time to unwind, shower, eat, and load up the car before rush hour in my area.
The drive up was pretty uneventful. Lots of empty highway and very few cars were on the road after I passed St. Joe’s. I stopped after the first hour to check my oil level and make sure the cooler wasn’t leaking anywhere. Everything looked great, so I carried on.
Speaking of the cooler, it was outstanding! Normal highway driving puts my 370Z in the 220 degree range. With the cooler on, it sat around 180 degrees and eventually dropped down to 160 as the ambient temperature started to dip into the 40s.
The Track
The morning of the first day was wet and dark. I arrived at RPM before everyone, so I had to guess at were to pull in and wait. Eventually, cars and people started to arrive, and the sun started to poke its head above the horizon. I met a few of the guys that would be running with me in HPDE-1/2, as well as my instructors for the day. My in-car instructor would be a fellow named Kurt, who drove a stripped-out time trials S2000. I would ride with Kurt the next day…Kurt was damned fast. The group instructor was an older guy named Terry, who was effing hilarious, and incredibly knowledgeable.
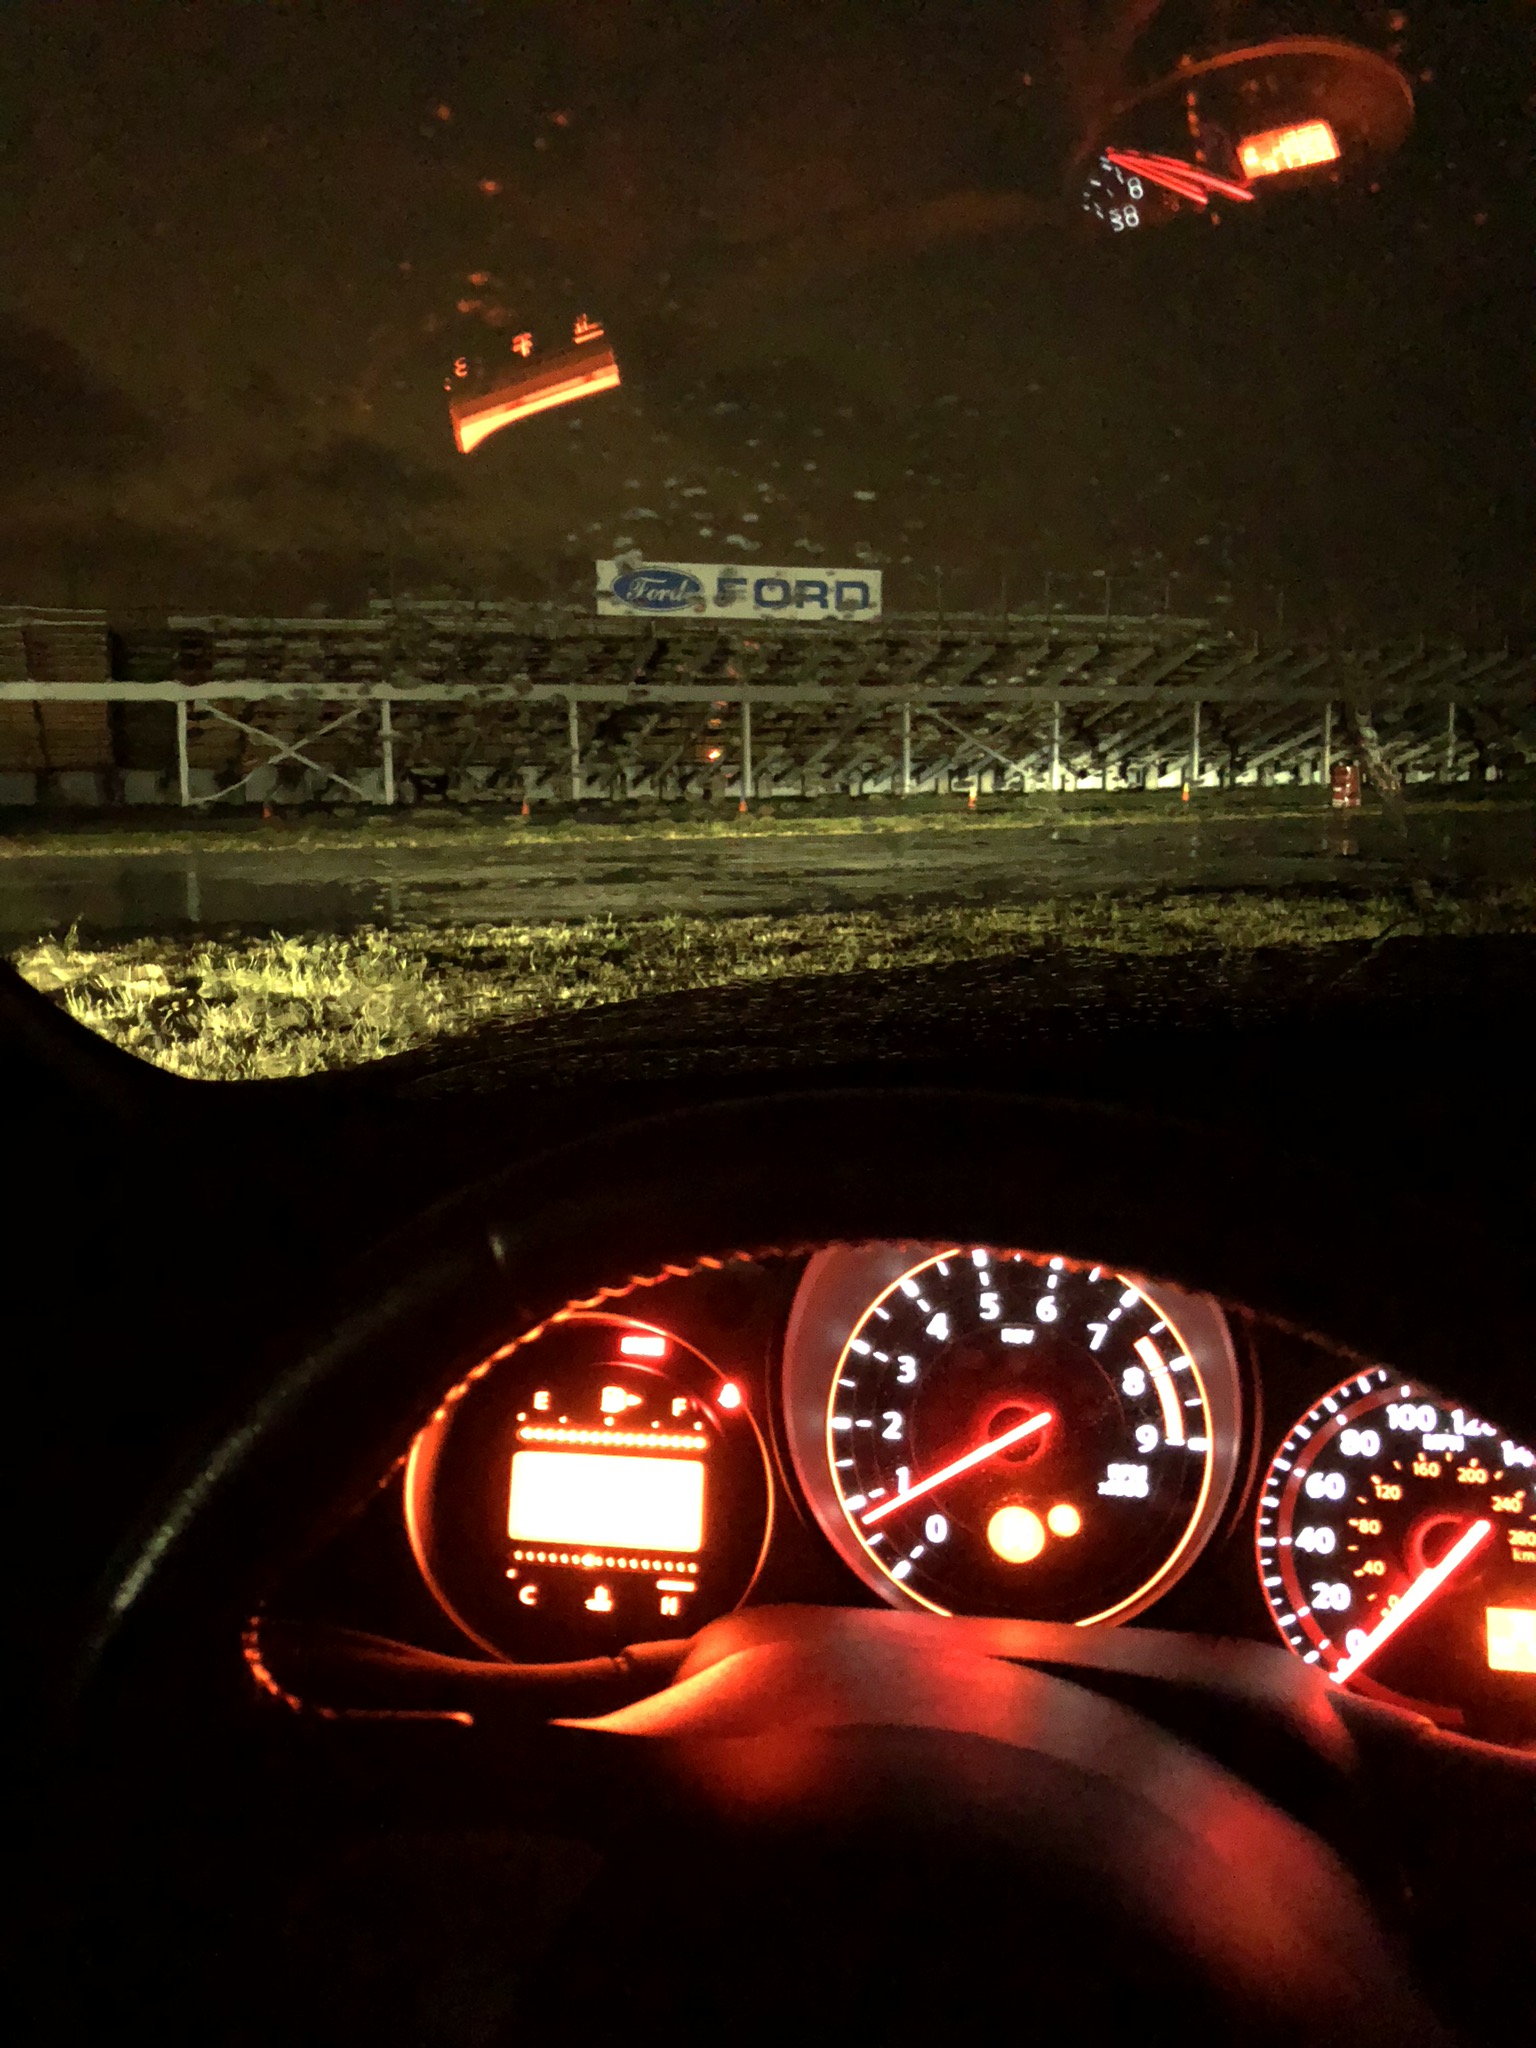
The First Morning. It’s 7AM.
We spent about an hour in the driver’s meeting, where they gave us some general racing line advice as well as detailing track etiquette. We also learned about the flags that could be waved in several of the manned corners of the track to inform the drivers during the sessions. For example:
Blue w/yellow stripe: Let the guy behind you pass
Yellow: Caution, slow down
Red: Session over, stop
Black w/red circle (meatball): Your car is broken, come in.
Checkered: Last lap
And I was off! Kurt and I donned our helmets and headed for the grid. It was still cold at this point, but at least it had stopped raining. We expected a little slickness and some puddles. There was a first lap to get tires and brakes up to temp, and then we were driving!
I would spin twice, but none of them were terrible. The first was an on track spin at slick turn 9, where there were a ton of offs. The second was after a trip through the mud of turn 3 (see the first pic). The first was because of the slick conditions, but the second was because I was starting to push the car harder than I had ever pushed a car. I had to get used to concepts that you don’t deal with in every day driving. I’ll discuss these more at some point in the future. By the end of the day, the track was dry and we were really starting to get moving. I was exceeding 120MPH on the front straight and beginning to brake hard coming into the turns. I started to grapple with the ABS pulsating and the tires running out of grip. I was having a blast.
And in a flash, Day One was over.
Day Two
I’ll get this out of the way now: the second day was miserable. After the first session, it started to pour and it never let up. With temperatures in the 40’s, it was a slick, puddley mess on the track all day.
Kurt and I didn’t let that stop us. We hopped back in the Z and got to work. The racing lines are a lot different in the wet. Places where you used to drive because they had lots of grip were now slick. I had to change everything and learn new turn-in points and braking zones. I had to dodge puddles growing larger throughout the day. The rear end stepped out more often, but along the way I simply figured out “countersteer and modulate throttle.” It was rough, and I was anxious all the way through.
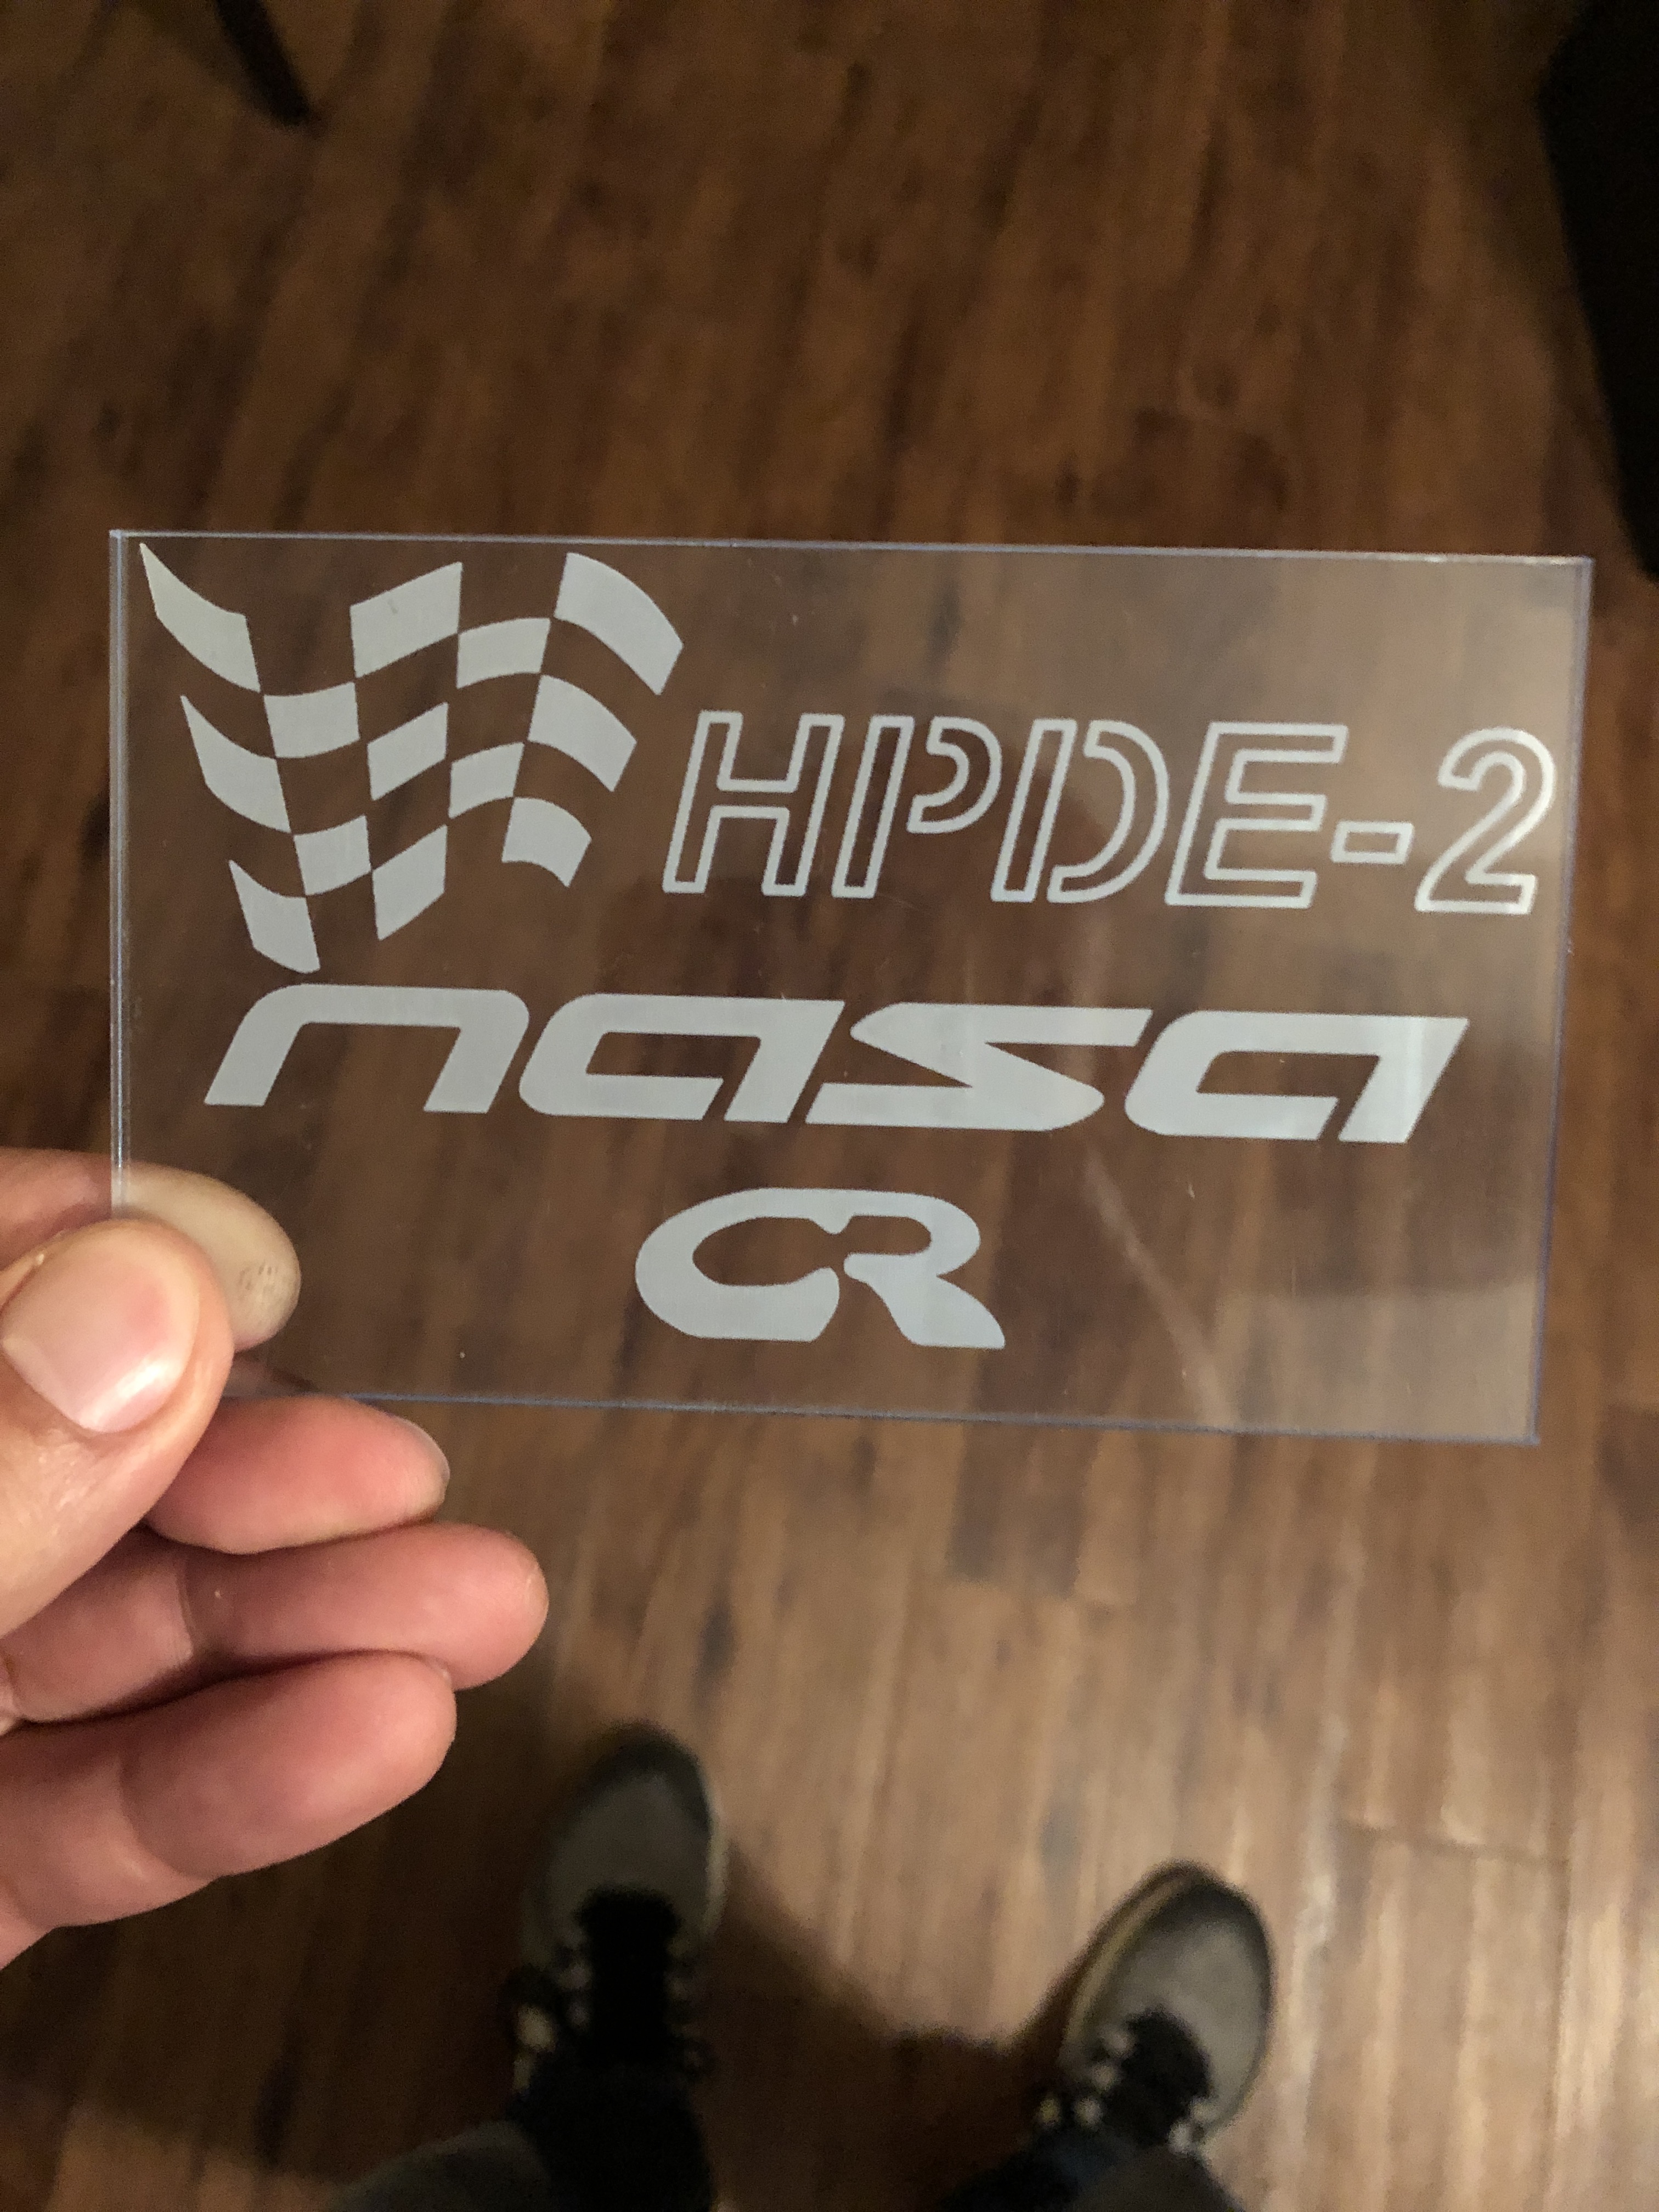
After the second session, I asked Kurt about moving up to HPDE-2. I told him I like him plenty but he was weighing down my car. We found out that he could give me a checkride on the next session. We went out, everything went swimmingly, and he gave me a thumbs up. That meant I’d get to drive solo for the last session, which was awesome! And I even got a lil’ plaque to commemorate the event:
They don’t just give these to anybody, ya know?
Since almost everyone had left by this point, there were only 5 cars that would be on the track for the final session, and they’d be grouping all the cars together for a 40-minute free-for-all. My first time out and I had to survive double my normal session! As a nice bonus, I downloaded Harry’s Lap Timer onto my phone so I could record lap times, video, and other data while driving around.
The session went off reasonably well. I was starting to get much more comfortable smashing the brakes in the awful wet, and my lap times dropped in response. And then, about halfway in, I simply forgot to brake on turn 5 until it was too late. I drove right off into the grass. I came into the pit for a quick inspection, and they sent me immediately back out. A complete brain fart and I survived unscathed. I kept pushing for the rest of the session, and before I knew it, 40 minutes had passed and the weekend was over. Here’s some video from the fastest lap in that 40 minute session:
Some Thoughts
First off, I’m not going to say that I recommend this for anyone. There’s a certainly level of comfort that you’re going to need with a few things:
Going way faster than you’ve ever gone on the street (legally).
Completely changing how you apply brake and throttle. It’s almost the inverse of the street.
Getting passed by people driving much faster than you.
Sometimes completely losing control and going along for the ride until it stops.
Not everyone can handle all of these things. And obviously, if your car isn’t up to the task you shouldn’t go, though tech inspection should catch that.
But if you do find yourself itching to try it out, go for it! I found that absolutely everyone was friendly and willing to trade tips, even the racing drivers. And of course, everyone is making sure that the whole event is run safely. There are very few accidents at NASA HPDE’s, and most times the ones that do happen are fairly tame.
I’ve had about a week since the event to reflect. If you’ve read some of my previous posts, you’ll know that I’ve been a gearhead since about 2001. I enjoy turning wrenches and bolting newfangled parts on. I’ve always loved “go faster” bits like turbos, coilovers, and exhausts, but rarely have I done anything that really tested those modifications.
The track is one of those ultimate litmus tests, much like a dyno for engine horsepower. It tests the sum total of the car and the driver. It seeks the weakest points and exposes them. It is the driver’s job to identify these deficiencies and rectify them.
Over the course of the weekend, obviously, I was the weakest link in the chain. I have very little high speed experience, and I did fail to perform quite a few times. However, even on the first day, I could start to sense some things that I’ll need to improve. First, I need some better tires for track days. There were two turns (5/6 & 14) where the stock street tires (Pilot A/S3+) completely ran out of grip and began squealin’ like little piggies. They’ll need to be upgraded to Nitto or Toyo racing tires. Second, I definitely need some kind of exhaust improvement. Besides simply wanting one for the sound, I had some real issues where I couldn’t tell that I was in the wrong gear simply from hearing the revs. The wind noise was louder than the stock exhaust. In the video you can barely hear the engine, and it was even duller in my helmet. Of course, most of the immediate improvement moving forward is going to come from seat time and focused learning.
Finally, I want to make a note about the more visceral side of the experience. There is nothing quite like doing road course work, especially as a newbie. I started out anxious and worried, and gradually progressed into being comfortable and competent (twice!). I found that transition to be very rewarding, especially once I was left out on my own. I didn’t notice this in the moment, but just after: the experience heightens your focus of your senses. Not only was I mentally focused on my different points to get around the track, but my eyes are looking everywhere for problems (other cars, puddles), my ears are listening for something unsettling (squeal of rubber or broken banging), and my whole body is trying to feel how the car is sliding around the track. Is the rear loose? Is the steering wheel fighting me? Is the engine pulling hard? Do the brakes feel right? And this is constant. It’s exhilarating to be so connected and so hyper-aware of the world. When you couple that with the drive to do well, it’s a complete package for absolute bliss.
I can’t wait to do it again. I hope to see you out there!
Over the past few years, one thing has become glaringly obvious to those paying any semblance of attention: our interactions on the internet have becoming increasingly relegated to monolithic entities.
Back in the wild west days of the internet, you could count on both a wide range of opinions and an array of forums for your own voice. While that does still exist to some extent today, the majority of conversations have been pushed to Facebook & Twitter. Most of our photos are archived in Facebook (Instagram) & Google Photos. All of our searches go through Google. Our events, Facebook. Our shopping, Amazon. Our email, Gmail. Our group organization, Facebook. Our videos, YouTube. And on it goes.
“They’re trashing our rights! TRASHHHINNNNGG!”
Many in the privacy world have been ringing the alarm about this for what seems like an eternity, and over those years, there are folks like me who have heard them but never taken action because it was not convenient. “Everyone else is on Facebook,” “Other search engines suck,” “No one else makes sharing photos as easy as Insta,” are the standard responses of my people.
I’m not here to tell you that all of these are terrible, indefensible positions. That has been covered by many others in far deeper detail than I can provide. My personal favorite reference on this is Bryan Lunduke, and I highly recommend listening to his podcasts or bingeing his YouTube videos.
What I will share, however, is one man’s attempts to decentralize and diversify his internet data portfolio.
Email
Something that has always driven me a bit bonkers is the notion that Google parses every single piece of email you send. I was a relatively early adopter of Gmail, switching over from a Hotmail account I had back in the early 2000’s. It had a better interface than Hotmail at the time, and it was all the rage. Over time, the feature set marginally expanded with calendar integration and such, and I was happy enough.
I had one “what the hell?” moment during Google’s early experiments with targeted advertisements. I was joking around with a friend about squirrels on speed, and by the next time I had opened up Gmail, my browser’s walls were decorated with ads for squirrel traps and pest control professionals. Like any brilliant person, instead of ceasing to use the product, I instead opted to block out the ads with an early ad blocker.
As I never stopped using ad blockers (though the particular extension would change over the years), I would rarely think about that time. Out of sight, out of mind…but Big G was still collecting data on me.
The privacy and personal data protection movement has gained a lot of momentum in the last several years, with enormous data breaches coming to retailers, email providers, and video game repositories alike. No one was invulnerable to hacker attack. And all the while, I was being gently provided with the idea that I was the product to any number of data farms.
In mid-2016, I decided to start separating my more personal email from my day-to-day operations like bills and social media notifications. I experimented with a variety of email providers, and eventually landed on ProtonMail. They offer encryption, tiered services, and a pleasant interface that has all the features I expect from an email client. To be straightforward: I do not require event handling in my personal email service. I need privacy, archiving, and some type of markup (bold/colors/etc) to aid lengthy conversations I often have. In that sense, ProtonMail is everything I need, and I’ve already begun to shift all my personal email traffic over, with my bills and other notifications to follow as I see the need to move them.
Operating Systems
I love messing with new operating systems for my computers. I’d always tweak and tinker with my parents’ computers, doing everything in my power to shuffle them into the newest OS or hardware as finances permitted. When I came into my own, I would keep up with the latest and greatest Windows system, and I eventually got exposed to Linux and open source software.
I was Brent Rambo as a kid. Minus the blonde hair and plus aviator-sized spectacles.
I tried a whole spread of distributions: Kanotix, Ubuntu, Mint, Debian, Arch…I’ve had a bunch of them over the years. I’ve settled in with Arch for my HTPC, but with my daily driver PC, I’ve meandered back to Windows 10. I’ve done what I can to mitigate data gathering on it, but I’m fully aware that it is still likely sniffing my transactions to inform some three-letter agency.
I even picked up an older Macbook Pro this weekend, simply to get exposed to the Apple ecosystem, which I’ve never used. I know a lot of folks hate on it, but so far I’m actually impressed with build quality and I’m getting used to the workflow.
While Mac’s High Sierra is built on a Unix core, it’s still quite different from Arch, and altogether different from Windows. I see this as another way to separate and differentiate my data.
The Idea
I think you get the idea now. While there is currently only so much (nothing) we can do to protect our data once it’s in the hands of these large data farms, we can do a few things to spread it about such that we make it that much harder for an individual company to use it all against us. Here are the steps I’ve taken so far, with more to come:
Divide my personal, professional, and task-oriented email
Diversified the operating systems I’m currently using
Deleted Facebook (I’m planning an entire post on this one). The recent news involving Cambridge Analytica was the final nail in the coffin for me.
Split my quality photos and “quick pics” between Flickr and Instagram. I’d like to leave Insta because it’s a Facebook company now, but I am not aware of another site with equivalent capabilities (fast upload w/phone app, community-oriented commenting) other than Twitter
Speaking of Twitter, I’m currently evaluating Gab.ai and Mastodon.social. There aren’t a whole ton of folks on the platforms at the moment, but that will change as the services provided increase and anti-censorship sentiments gain momentum.
Finding YouTube alternatives. If you didn’t know, YouTube is maintained by Google, and there is a growing belief that it is also censoring non-conforming political views by demonetizing those creators. There are a few out there (Vimeo, BitChute, Minds…) but they are all lacking in one area or another. I don’t upload videos, so that’s not a concern of mine, but I do use YouTube extensively for commentary and tutorials. I have found a few content creators have alternate venues for getting out their podcasts/demos, so I’m using those where I’m able. An intriguing new option is lbry.io, but that is just starting to take baby steps.
And that about wraps it up for my data diversity discussion. During this continuing journey, I hope to update you all on the various interesting complications and realizations I encounter along the way.
Back at the end of July, I made a post discussing a new workout plan I was starting. I had originally planned to review it immediately after the first “cycle,” but I decided to wait until the close of the second pass through to do a review.
The Routine
There are seven exercises that make up the three-day-a-week routine: squats, bench press, bent over rows, overhead press, straight-legged deadlifts, curls, and calf raises. Before starting the plan, you go into the gym and figure out about how much weight you can comfortably do eight repetitions of each exercise with. That will be your max weight for the first day of the first week (heavy day), of which you will do two working sets. For the first three exercises, you add in two warmup sets, the first with 1/4 of the working set weight, and the second with 1/2 of the working set weight. The table below shows my first day’s routine:
Heavy Day (Monday)
Exercise
Warmup 1
Warmup 2
Working Sets
Squats
35
70
140
Bench Press
45
90
180
Bent Over Rows
30
60
120
Overhead Press
N/A
N/A
70
Straight-legged Deadlifts
N/A
N/A
135
Curls
N/A
N/A
65
Calf Raises
N/A
N/A
70
For the following two days of AllPro, Wednesday and Friday, you decrease the load to 90% for Wednesday, and 80% for Friday.
The number of reps to get in is a five-week cycle. Week 1 you perform eight reps in each set, Week 2 nine reps, and so on, until at Week 5 you are doing twelve reps in each set.
At the end of each cycle, you increase the heavy day weights by 10%, and repeat the whole process.
You do not have to do these exact exercises with an Olympic bar. You can sub in Smith machine or dumbbells if necessary. That’s exactly what I had to do at Snap.
It’s a gym. Mostly.
Results
Since there are changes to both reps and weights across this time, the most useful metric for comparison is looking at the one rep max (1RM, see here for the calculator) and the improvement. Note that there appear to be some inconsistencies, but that is primarily due to rounding up or down to make the “plate math” easy.
1RM Comparison
Exercise
Start
Finish
Squats
175
220
Bench Press
225
286
Bent Over Rows
144
179
Overhead Press
88
114
Straight-legged Deadlifts
169
214
Curls
81
107
Calf Raises
88
107
Overall, I am satisfied with the strength progress to date. Other than the strength increases, the size gains are nice. In only a few short months, I am noticeably bigger. Nothing huge, but my shirts and jeans fit more tightly. It’s excellent motivation to keep on going with this routine…at least until I need to buy new clothes.
What I Like
First off, I think the balance of this plan is excellent:
When I get home, I feel like I’ve done a great job at hitting everything important. Next, I find that the psychological profile of the plan makes it easy to keep going. The progress from heavy day to light day forces you to go, questioning your manhood the whole way. “What? You don’t wanna go? It’s LIGHT DAY. Can’t handle a LIGHT DAY, you big sissy? You just did 10% more two days ago.” In the same manner, after that light day, you get two days off before you only add in one single rep for each exercise. Also, after you complete a cycle, the beginning of the next is a psychological win as you’re lifting heavier weights, but from the perspective of 1RM you’re actually in a deload phase by virtue of lifting for fewer reps.
There are even options for making up missed days: if you miss a medium day, you simply replace the light day with another heavy day. If you miss a light day, you just skip it. Miss a heavy day and Mark Rippetoe will find you and give you a stern talking to.
What I Don’t Like
My gripes with this plan are minimal and normal for most routines:
‘Missing’ exercises – as in, “I miss doing them.” I really enjoy standard deadlifts and tricep pull downs, but this plan hits those same muscles pretty hard without them.
No variety – this is a double-edged sword of the AllPro workout. It’s nice that you don’t have to think or plan at all for the next several months (which makes it great for establishing a routine), but sometimes you just want to throw in some flys or lat pull downs.
Unsustainable rates – this workout cannot be continued ad infinitum at the rate of 10% increase per cycle. You will eventually plateau. This is not a big deal, as this is billed as a beginner/intermediate workout.
No method for balancing poorly performing exercises. You’ll notice in my results that my lower body is kinda crap compared to my upper body. AllPro provides no direct method for working that out.
That’s it.
Moving Forward
I plan on continuing the AllPro workout straight until I stall out. I’m satisfied with my progress physically and aesthetically, and it is a piece of cake to lock into the routine. I am thinking of working in some minor leg exercises to try to improve my lower body performance, but I’ll generally stick to this plan. Once I plateau (hopefully not until late next year), I’ll switch to a 5×5 plan like this one: Bill Star 5×5. Double thanks to user AllPro on the BB forums for this excellent plan! That’s all for now!
Note:
The clever among you will notice that the time between 7/23 and 11/11 is not ten weeks. Right around the end of the first cycle, I had a minor back sprain to deal with and I took a small vacation. ‘Twas just life!
In a break from the (til now) norm, I’m going to talk about a topic I adore: Chaos. I will try to make most of this post relatable for the layman.
What the hell is it?
In the sense of the dictionary, chaos is some occurrence that seems so unpredictable as to appear random. In the physics & mathematics world, we have a slightly more technical definition:
Chaos is the behavior of dynamics systems that are highly sensitive to initial conditions.
For the uninitiated, let’s start with some basic terms from that sentence:
System – a series of connected parts that operate together to produce some measurable output. An electrical circuit, a mechanical device, a chemical process. These can all be modeled as systems.
Dynamics – the study of the change of these systems over time. This is in comparison to statics, where the system is unchanging.
Initialconditions – the starting point of the system. Think of ball in a bowl. It can begin in the bottom of the bowl, along the sides, or at the top.
Highlysensitive – small changes in the initial conditions lead to large differences in the end result.
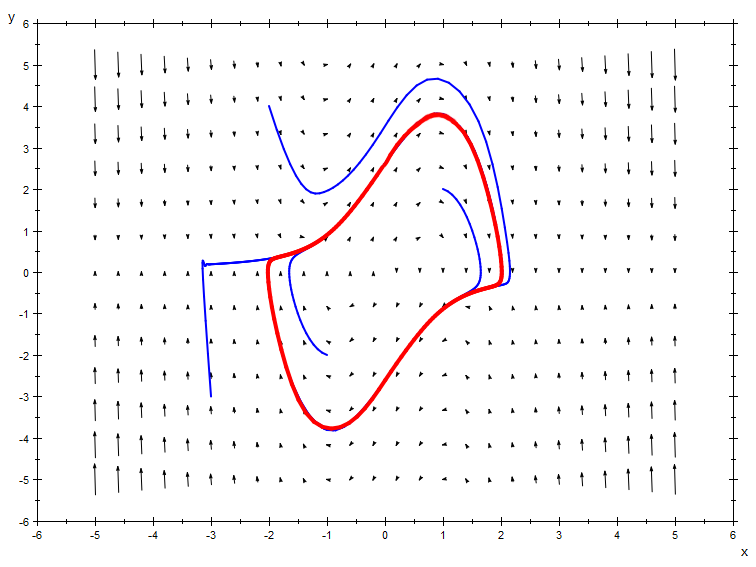
For a textbook version of non-chaotic systems, we can look to the archetypal Van Der Pol oscillator in two dimensions:
Phase Portrait of the Van Der Pol oscillator (source: Wikipedia.)
This oscillator is a model of an electronic circuit that has a cyclical output under certain conditions (check out wiki for the schematics). Even for those unfamiliar with dynamic systems and phase portraits, you can interpret the image above like this: the blue lines are the path of the system starting at some arbitrary point. Think of the graph as a topography with the arrows pointing downhill, and the system as a drop of rain that flows with gravity.
At some particular space on the phase portrait, the system is being “pushed” in some direction. For example, you can see that at the edges of the plot, it is being pushed towards the center in every position.
The red “pool” shape is an orbit that the system gets locked into, a pattern that keeps repeating itself. As you can see from the portrait, no matter where you start you end up in the pool orbit.
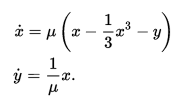
2D Van Der Pol Equations
For the geeks like me, I’ve attached the 2D variant of the Van Der Pol equations above. These (x-dot and y-dot) are the equations of the slopes (or gradient) in each direction, at a particular point on the phase portrait. μ is a constant value that changes the shape of the pool, and is ~1.5 for the plot above. Plug in a value of x or y on the portrait (say X=10, Y = 10), and you’ll see that the sum of those vectors gives you the direction and magnitude of the arrow at that point.
The Lorenz Butterfly
The go-to demonstration of nonlinear chaos is the Lorenz Strange Attractor, also known as the Lorenz Butterfly. Lorenz came across this system when he was studying atmospheric convection – the study of heat being passed through the air from the warm equator areas of Earth into the areas nearer the poles.
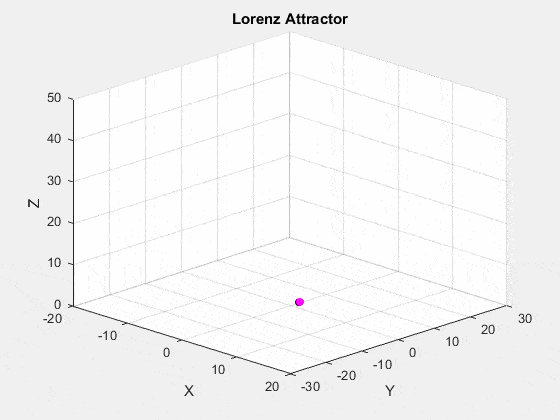
I’ve put together an animation in MATLAB to show two things:
How awesome chaos in three dimensions is, and
The sensitivity to initial conditions. The black point starts at (x, y, z) = (1, 1, 1), and the magenta point starts at (x, y, z) = (1.1, 1.1, 1.1).
Pay special attention at the beginning to where the two points start, how rapidly they start to veer apart, and where the tracks decide to switch sides of the butterfly. Also notice that there appear to be two attractors, points that the system hovers around, but never crash into, like the pool in the Van Der Pol oscillator.
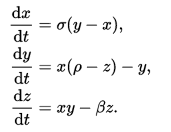
Ordinary Differential Equations for the The Lorenz Attractor
Since we’re in three dimensions, there’s an extra equation for the system. Naturally, the phase portrait would also be three dimensional, and tough to display. In these equations, dx/dt, dy/dt, and dz/dt are equivalent to x-dot in the oscillator. They determine the gradient in the phase portrait at a point (x, y, z). The fancy Greek letters (σ, ρ, β) are again constants like μ. In this case, (σ, ρ, β) = (28, 10, 8/3).
So, fun stuff! It always fascinates me how rather unassuming physical systems can lead to surprising dynamic studies. If you’re interested in this topic, I recommend Nonlinear Dynamics and Chaos by Strogatz.